
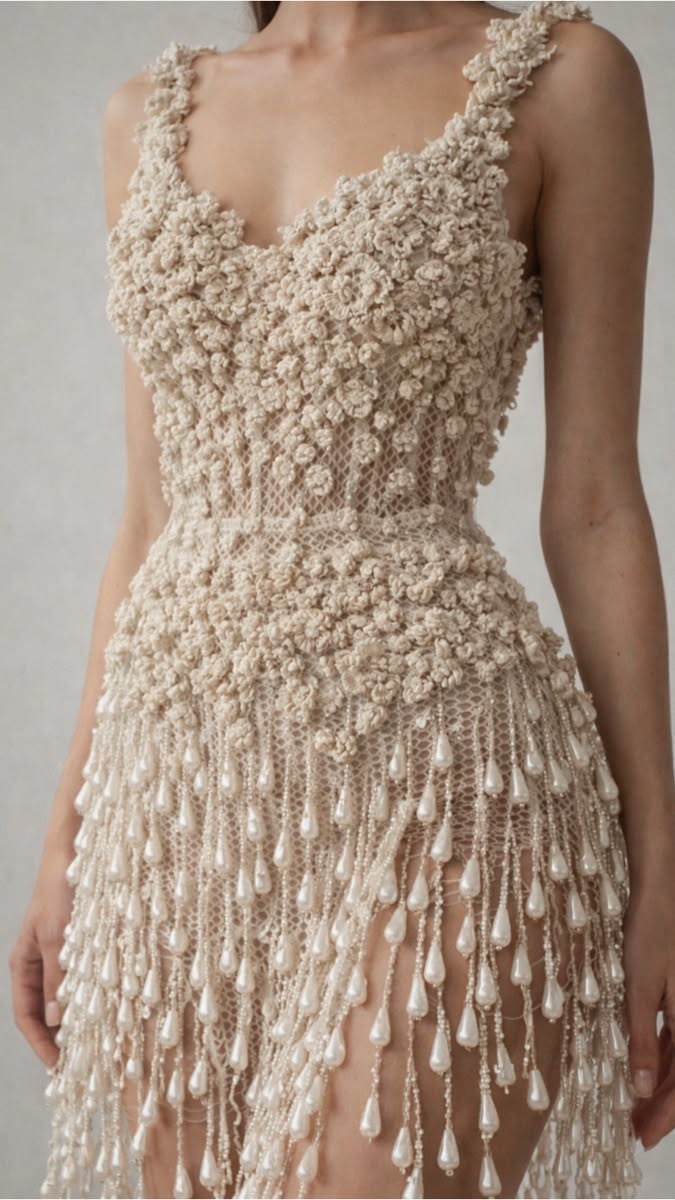
This pattern makes a sleeveless crochet dress with a raised floral bodice, a shaped waist and a gently flared skirt hung with pearl strands. It suits a confident beginner who can work sc, dc and simple shaping in the round. Estimated working time is about 12 to 16 hours depending on size.
Pearl Cascade Floral Bodice Crochet Dress
Free crochet pattern · US terms
- Yarn
- 3 – Light (DK) — suggested
- Hook
- 4.0 mm (G-6) — verify with a swatch
- Gauge
- 18 sts x 20 rows = 4 in (10 cm) in sc worked in joined rounds, unblocked (calculated, not measured)
- Size
- approx. Approximate finished bust 32 to 44 in (81 to 112 cm) across sizes XS to XL; dress length about 36 in (91 cm) from shoulder to hem in size S.
- Level
- Confident beginner
- Time
- about 14 h (estimate)
Written and count-checked on paper, not yet physically tested. Make the gauge swatch and the checkpoint below before you commit all your yarn.
The dress is worked top down in joined rounds: a floral bodice panel, a fitted waistband, then a flared skirt finished with a picot hem and hand-strung pearl cascades. The bodice flowers are made as small raised clusters on the surface, so no separate motifs need joining.
It suits intermediate-beginner crocheters comfortable with round joins and stitch counting. The pearl strands are optional and can be shortened for a simpler, faster make.
Before You Start
Materials
Suggested materials. Any yarn of the same weight works if you match the gauge.
4 to 6 skeins (50 g each) DK cotton-bamboo blend
A smooth DK with slight drape gives clean stitch definition for the floral texture. A DK acrylic works as a substitute but will feel warmer and drape less.
4.0 mm (G-6) crochet hook
Matches the suggested DK weight and the gauge below. Swatch and change hook size if your gauge differs.
About 60 to 120 small pearl beads with holes large enough for your yarn
Beads form the cascading strands on the skirt. Plastic pearls are lighter and easier to thread than glass.
Tapestry needle
For weaving in ends and securing pearl strands. A blunt tip works best with DK yarn.
Stitch markers
Useful for marking round joins and waist shaping points. Paper clips work as a substitute.
Yarn needed (estimate): Estimated about 900 to 1400 yd (820 to 1280 m), roughly 4 to 6 skeins of 50 g
Gauge and Size
Gauge: 18 sts x 20 rows = 4 in (10 cm) in sc worked in joined rounds, unblocked. This gauge is calculated from the yarn and hook above, not measured on a finished sample. Make a 4 in (10 cm) swatch first; change the hook size, not your tension, until it matches.
Finished size (approximate): Approximate finished bust 32 to 44 in (81 to 112 cm) across sizes XS to XL; dress length about 36 in (91 cm) from shoulder to hem in size S.. Your size depends on your gauge.
Abbreviations (US terms)
| Abbr. | Meaning |
|---|---|
| ch | chain |
| sl st | slip stitch |
| sc | single crochet |
| dc | double crochet |
| st/sts | stitch/stitches |
| sp | space |
| inc | increase (2 sc in the same stitch) |
| dec | decrease (sc 2 together) |
| FO | fasten off |
| rep | repeat |
| BLO | back loop only |
Special Stitches
Floral cluster (fl-cl)
Work 3 dc in the same stitch, then ch 2 and sl st into the top of the last dc to close the petal group. This creates one raised flower bud on the surface.
Picot
Ch 3, then sl st into the first ch made. Used on the hem for a small decorative bump.
Beaded strand
Thread beads onto the yarn before working, then slip one bead up before each ch to place it on the strand.
How This Pattern Is Written
- All rounds are joined with a sl st to the first st of the round unless stated otherwise. Do not turn; continue in the same direction so the right side faces out.
- The turning ch (ch 1) does not count as a stitch and is not worked into. Start each round in the same st as the join unless the instructions say otherwise.
- The bodice is worked top down in joined rounds. The floral texture is added as surface clusters on Round 6 and Round 10, worked in place of the sc in the indicated stitch.
- The waistband uses BLO sc to create a slight ridge. The skirt increases gradually below the waist.
- Sizes are written for XS with larger sizes in parentheses: XS (S, M, L, XL). Where only one number is given, it applies to all sizes.
- All measurements and yardage are calculated from the stated gauge and are estimates, not measured from a finished garment.
The Pattern
Bodice
Waistband
Skirt
Finishing and Assembly
Sizes and Variations
Sleeveless to cap sleeve
After Round 5, work 6 rows of dc in the round for a short sleeve before continuing the bodice.
Longer skirt
Add 10 to 15 extra sc rounds before Round 41; each extra round adds about 0.2 in (0.5 cm) to the length.
Simpler pearl trim
Use only 4 to 6 pearl strands at the front instead of around the whole skirt.
Size adjustment
For a larger bust, add one increase round after Round 15; this adds 12 sts and shifts the waistband counts by 12.
Troubleshooting
| What you see | Likely cause | Fix |
|---|---|---|
| The bodice ripples and does not lie flat | Too many increases or a loose gauge | Frog back to the last flat round and check your stitch count. Work the next round with the same hook but slightly tighter tension, or go down one hook size. |
| The waistband feels too tight | The decrease round removed too many stitches for your size | Undo Round 20 and work the decreases every 10th st instead of every 8th, giving 102 sts. Adjust the skirt increases to match. |
| Floral clusters look flat | Clusters worked too loosely or with a smaller hook | Work each fl-cl with a slightly taller dc and pull the closing sl st snug. Blocking also lifts the petals. |
| Pearl strands sag or tangle | Strands too long or beads too heavy | Shorten strands to 2 to 3 in (5 to 8 cm) and space them evenly. Use plastic pearls rather than glass. |
| The hem curls upward | The picot round tightened the edge | Work the picot round with a hook one size larger, or add one plain sc round before the picot round. |
Care
Hand wash in cool water with mild soap and lay flat to dry. Do not wring or tumble dry. Steam block the bodice and hem lightly, keeping the iron off the pearls.
Questions Makers Ask
Can I make this dress in a larger size?
Yes. The pattern is written for XS to XL. For larger sizes, add increase rounds in the bodice and skirt as described in the variations, and recalculate the waistband decreases so the stitch count stays divisible by 4.
Do I need to use pearls?
No. The pearl strands are decorative and optional. The dress works as a simple floral-textured dress without them, and the hem picots give a finished look on their own.
How much yarn does the dress use?
Estimated about 900 to 1400 yd (820 to 1280 m) depending on size, based on the stated gauge. Buy one extra skein to allow for swatching and adjustments.
Is this pattern suitable for a beginner?
It suits a confident beginner. You need joined rounds, sc, dc, cluster stitches and simple shaping. Practice the floral cluster on a small swatch before starting the bodice.
Next: Try a crochet top with the same floral cluster texture to practice the bodice technique on a smaller piece.