Nestora
Street Lamp Couple Amigurumi: Free Crochet Pattern
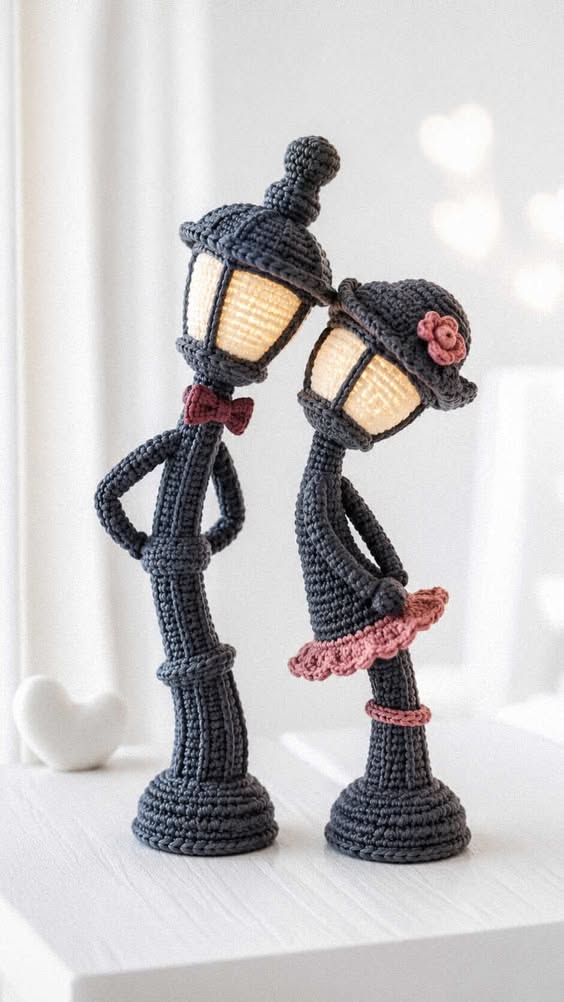
You will crochet a small street lamp post with a lantern that holds a battery tea light, plus two simple figures who lean toward each other. It uses single crochet, increases and decreases in continuous rounds, so a confident beginner can finish in about four hours of working time.
Street Lamp Couple Amigurumi
Free crochet pattern · US terms
- Yarn
- 2 - Fine (sport weight) — suggested
- Hook
- 2.75 mm (C-2) — verify with a swatch
- Gauge
- 22 sts x 24 rounds = 4 in (10 cm) in sc worked in continuous rounds, unblocked (calculated, not measured)
- Size
- approx. Lamp post about 9 in (23 cm) tall including the lantern; each figure about 4.5 in (11 cm) tall
- Level
- Confident beginner
- Time
- about 4 h (estimate)
Written and count-checked on paper, not yet physically tested. Make the gauge swatch and the checkpoint below before you commit all your yarn.
The finished piece is a freestanding lamp post about 9 in (23 cm) tall with a lift-off lantern, and two figures about 4.5 in (11 cm) tall that stand at its base. The post is worked in continuous rounds from the base upward, the lantern is a separate cup that sits over the bulb opening, and each figure is a one-piece body with a head, tiny arms and a separate accessory (a bow tie and a ruffled skirt).
It suits anyone who has made a ball or a simple sphere before and wants a small scene with a few charming details. The figures are deliberately simple so the pose and the accessories carry the character.
Features are embroidered rather than attached with plastic parts, and the lantern light is a battery tea light, never a real flame.
Before You Start
Materials
Suggested materials. Any yarn of the same weight works if you match the gauge.
1 skein (about 80 yd / 73 m) sport weight cotton in charcoal gray
Cotton holds the post straight and does not fuzz under a warm tea light. Acrylic works but may lean; add a pipe cleaner in the post if you use it.
1 skein (about 40 yd / 37 m) sport weight cotton in cream
Used for the skirt, the bow tie and the lantern glow panel. A smooth cotton shows the ruffles clearly.
1 skein (about 20 yd / 18 m) sport weight cotton in dusty rose
The skirt figure's body and the small heart. Any soft pink substitute is fine.
1 skein (about 15 yd / 14 m) sport weight cotton in navy
The bow tie figure's body. Dark colors hide embroidery, so keep the face on the cream head instead.
2.75 mm (C-2) crochet hook
Matched to sport weight so the fabric is dense enough to hold stuffing. A 3.0 mm (D-3) gives a slightly looser, softer figure.
Polyester fiberfill, small handful
About a fistful total. Use small pinches so the figures stay smooth, not lumpy.
Battery-operated LED tea light, about 1.5 in (3.8 cm) wide
The lantern sits over it. Never use a candle with a flame inside a crocheted piece.
Tapestry needle, stitch marker, scissors, black embroidery floss
The marker tracks continuous rounds; the floss makes the eyes and smile.
Yarn needed (estimate): about 150 yd (137 m) total across four colors
Gauge and Size
Gauge: 22 sts x 24 rounds = 4 in (10 cm) in sc worked in continuous rounds, unblocked. This gauge is calculated from the yarn and hook above, not measured on a finished sample. Make a 4 in (10 cm) swatch first; change the hook size, not your tension, until it matches.
Finished size (approximate): Lamp post about 9 in (23 cm) tall including the lantern; each figure about 4.5 in (11 cm) tall. Your size depends on your gauge.
Abbreviations (US terms)
| Abbr. | Meaning |
|---|---|
| ch | chain |
| sl st | slip stitch |
| sc | single crochet |
| hdc | half double crochet |
| dc | double crochet |
| st | stitch |
| sts | stitches |
| inc | increase (2 sc in the same stitch) |
| dec | decrease (sc 2 together) |
| BLO | back loop only |
| FLO | front loop only |
| MR | magic ring |
| rep | repeat |
| FO | fasten off |
Special Stitches
Magic ring (MR)
Wrap the yarn twice around two fingers, insert the hook into the loop, pull up a loop, ch 1 to secure, then work the stated stitches into the loop. Pull the tail to close the hole.
Increase (inc)
Work 2 sc into the same stitch. This adds one stitch and makes a flat or rounded shape grow.
Invisible decrease (dec)
Insert the hook into the front loop of the next stitch only, then into the front loop of the following stitch, yarn over and pull through both loops, yarn over and pull through the last 2 loops. It leaves less of a bump than a standard decrease.
Front loop only / back loop only (FLO / BLO)
Each sc has two top loops. Work into the loop nearer you (FLO) or the loop farther from you (BLO) to create a ridge or a free loop for a later round.
How This Pattern Is Written
- All pieces are worked in US terms in continuous spiral rounds. Do not join or turn unless a row says so; place a stitch marker in the first stitch of each round and move it up as you go.
- The turning chain does not apply here because nothing is worked in joined rows. Where a chain is used (the lantern top and the heart), the chain is not counted as a stitch.
- Right side faces out. Work the post and the figures with the starting tail inside.
- The lamp post and the lantern are two separate pieces. The lantern is a cup that drops over the top of the post, so the tea light can be switched on and off.
- The figures are made as one body-and-head piece each, then given arms, a face and one accessory. The leaning pose comes from the arm placement, not from bending the body.
- Every count below follows from the stitches written before it. If a count does not match, rip back to the last correct round rather than adding stitches.
The Pattern
Lamp Post
Lantern
Figure Bodies (make 2: one navy, one dusty rose)
Arms, Bow Tie, Skirt and Heart
Finishing and Assembly
Sizes and Variations
Taller post
add 6 rounds to Rounds 15-26 (work 18 rounds instead of 12). The post grows about 1 in (2.5 cm) and the round count stays the same elsewhere.
Single figure
make one body only and attach it to the post base with one arm resting on the post. The yarn amount drops to about 100 yd (91 m).
Warm glow lantern
work the lantern in pale yellow instead of cream so the light reads warmer through the fabric. No count changes.
Keychain version
omit the post and attach a split ring to the top of one figure's head. Skip the tea light entirely and keep the piece small.
Troubleshooting
| What you see | Likely cause | Fix |
|---|---|---|
| The base of the lamp post cups upward instead of lying flat | Tension is tighter than the swatch, so the increase rounds pull in | Rip back to Round 6 and rework Rounds 2-6 with a hook one size larger, or add one extra plain round after Round 6 before the BLO round. |
| Stuffing shows through the figure bodies | The hook is too large for the yarn, or the stuffing is pushed in too firmly | Switch to a 2.5 mm hook for the figures and add stuffing in small pinches. A slightly smaller hook closes the gaps between stitches. |
| The lantern will not sit level on the post | The lantern seat (Rounds 29-31) is wider or narrower than the lantern opening | Measure the lantern's rim against the seat. If the seat is too wide, rip back Round 31 and work it without the increases; if too narrow, add one more increase round. |
| The two figures look like they are facing away from each other | The arms were sewn on straight instead of angled | Unpick the inner arms and re-sew them so the hands point toward the center of the scene. The bodies stay upright; only the arms angle. |
| The skirt ruffles flop down instead of standing out | Round 2 was worked too loosely, or the yarn is heavy for the hook | Rework Round 2 with a tighter tension and the same hook, then block the skirt lightly over a small cup to set the flare. |
Care
Spot clean with a damp cloth and mild soap, then air dry away from direct heat. Remove the tea light before cleaning. Do not machine wash or tumble dry, because the stuffing will clump. Reshape the figures by hand while damp.
Questions Makers Ask
Can I use worsted weight yarn instead of sport?
Yes, but the piece will be larger. With worsted weight and a 4.0 mm (G-6) hook, expect a post about 12 in (30 cm) tall and figures about 6 in (15 cm) tall. Keep the same stitch counts; only the size changes.
How does the lantern glow?
A battery-operated LED tea light sits on the wide seat at the top of the post, and the cream lantern cup drops over it. The light shines through the stitches. Never use a real candle.
Do I have to make both figures?
No. One figure works fine, and the pattern is written so you can stop after the first body. The scene reads as a single character waiting by a lamp.
How do I keep the figures standing upright?
Stuff the lower body firmly and leave the base flat, then sew the feet to the lamp post base with a few stitches. The post gives them something to lean against.
Next: Try a small amigurumi bench or a potted plant to sit beside the lamp and build a tiny street scene.