Nestora
Leafy Medallion Crochet Pattern: Free Cable Stitch Scarf
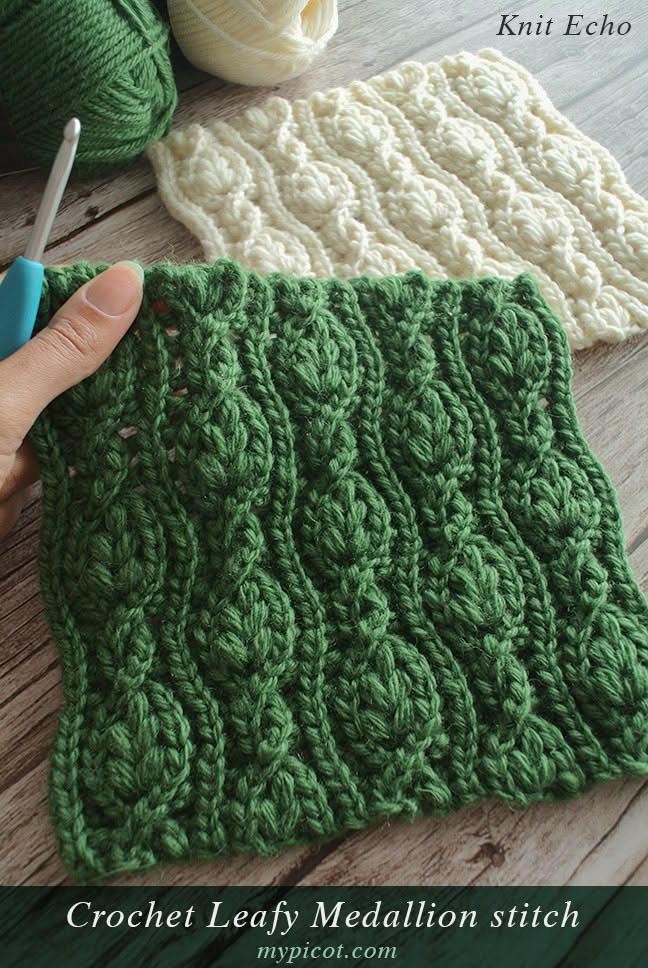
This pattern makes a long textured scarf in a leafy medallion cable stitch worked side to side. You need confident-beginner skills: chains, single and double crochet, front post stitches and simple two-stitch cables. Estimated working time is about 4 to 5 hours for a 60 in scarf.
Leafy Medallion Cable Stitch Sampler Scarf
Free crochet pattern · US terms
- Yarn
- 4 - Medium (worsted) — suggested
- Hook
- 5.0 mm (H-8) — verify with a swatch
- Gauge
- 16 sts x 14 rows = 4 in (10 cm) in the main medallion pattern, unblocked, measured over the middle of the swatch (calculated, not measured)
- Size
- approx. About 6.5 in (16.5 cm) wide by 60 in (152 cm) long, calculated from the stated gauge and row count
- Level
- Confident beginner
- Time
- about 4 h 30 min (estimate)
Written and count-checked on paper, not yet physically tested. Make the gauge swatch and the checkpoint below before you commit all your yarn.
The scarf is one flat rectangle worked in rows from short end to short end, so the leafy medallions stack across the width and repeat along the length. Raised front post double crochets form the vine, and crossed double crochets make the small leaf shapes between them.
It suits crocheters who can keep a steady stitch count and are ready to try post stitches and a basic cable. The fabric is dense enough for cold weather and lies flat with light blocking.
Before You Start
Materials
Suggested materials. Any yarn of the same weight works if you match the gauge.
2 to 3 skeins of worsted weight yarn, about 220 yd (200 m) each, in a solid light or medium color
A smooth, plied worsted shows cables clearly; fuzzy or dark yarn hides the texture. A heavy DK weight can substitute if you match gauge.
5.0 mm (H-8) crochet hook
Matches worsted weight for a firm fabric that holds cable texture. Go up to 5.5 mm (I-9) if your swatch comes out too narrow.
Tapestry needle
Used to weave in ends and to join the fringe if you add it. A blunt tip slides through crochet stitches without splitting them.
Stitch marker or scrap yarn
Marks the first stitch of the row so the turning chain is not mistaken for a stitch. Any removable clip works.
Tape measure and scissors
Needed for the gauge swatch and checkpoint. Sharp scissors give clean fringe ends.
Yarn needed (estimate): Estimated about 480 yd (440 m), about 2 skeins of 220 yd (200 m) / 100 g
Gauge and Size
Gauge: 16 sts x 14 rows = 4 in (10 cm) in the main medallion pattern, unblocked, measured over the middle of the swatch. This gauge is calculated from the yarn and hook above, not measured on a finished sample. Make a 4 in (10 cm) swatch first; change the hook size, not your tension, until it matches.
Finished size (approximate): About 6.5 in (16.5 cm) wide by 60 in (152 cm) long, calculated from the stated gauge and row count. Your size depends on your gauge.
Abbreviations (US terms)
| Abbr. | Meaning |
|---|---|
| ch | chain |
| sl st | slip stitch |
| sc | single crochet |
| dc | double crochet |
| FPdc | front post double crochet |
| dc2tog | double crochet 2 stitches together |
| st | stitch |
| sts | stitches |
| sp | space |
| rep | repeat |
| FO | fasten off |
Special Stitches
Front post double crochet (FPdc)
Yarn over, insert the hook from front to back around the post of the stitch two rows below, then front to back to the starting side. Yarn over and pull up a loop, then finish as a normal double crochet. The stitch sits in front of the fabric and makes the raised vine.
Left cross cable (LC)
Skip the next stitch. Work 1 dc in the following stitch, going in front of the skipped stitch. Then work 1 dc into the skipped stitch, inserting the hook behind the first dc. This crosses two stitches with the right-hand stitch in front.
Double crochet 2 together (dc2tog)
Yarn over, insert the hook in the next stitch, yarn over, pull up a loop, yarn over, pull through 2 loops. Yarn over, insert the hook in the following stitch, pull up a loop, yarn over, pull through 2 loops, yarn over, pull through all 3 loops.
How This Pattern Is Written
- Worked flat in rows from short end to short end. Turn at the end of every row.
- The turning chain of 2 does not count as a stitch. Work the first dc of each row into the first stitch, and mark it if you tend to lose it.
- Right side faces you on odd-numbered rows. The raised vine and leaf crosses are made on the right side; wrong-side rows are plain dc.
- All post stitches are worked around the post of a stitch in the row two below the current row, which is why the row below a cable row is plain.
- Stitch counts include every stitch across the row; the chain-2 turning chain is not counted.
- Each LC block uses 2 stitches; Row 5 has 5 LC blocks separated and edged by dc, for 24 sts total. The stitch count stays constant on every row.
The Pattern
Scarf
Finishing and Assembly
Sizes and Variations
- Array
- Array
- Array
Troubleshooting
| What you see | Likely cause | Fix |
|---|---|---|
| The scarf gets wider or narrower as you go | The turning chain is being counted as a stitch, or the first stitch of the row is being skipped. | Count each row before turning. The ch 2 is not a stitch, so the first dc goes into the very first stitch, and the row should read 24 sts. |
| The raised vine looks flat or disappears | The FPdc was worked into the stitch directly below instead of around the post two rows down. | Look two rows below the working row, find the post of the stitch, and wrap the hook around it from front to back. The raised stitch should sit on top of the fabric. |
| Holes appear where the leaf crosses | The skipped stitch was worked too loosely, or the second dc went into the wrong stitch. | Keep the first dc snug, then work the second dc into the skipped stitch behind it. Pull gently on both stitches after making them to close the gap. |
| Edges are wavy | Tension changes between plain dc rows and cable rows. | Work the cable rows slightly looser and the plain rows at normal tension. Light blocking at the end evens out small waves. |
| The swatch is narrower than 4 in (10 cm) | Tension is tighter than the gauge, or the yarn is thinner than worsted. | Try a 5.5 mm (I-9) hook and measure again. If the width is still off, add one 8-stitch repeat, which changes the count by 8. |
Care
Hand wash in cool water with mild soap, squeeze gently without wringing, and roll in a towel to remove water. Lay flat to dry and reshape to size; do not tumble dry or iron.
Questions Makers Ask
Do I need a chart for the leafy medallion stitch?
No. The pattern is written row by row with the repeat stated, and every row keeps 24 stitches, so you can follow the text alone. A chart helps visual learners, but it is not required.
Can I make this scarf wider or narrower?
Yes. Each medallion block is 8 stitches, so add or remove multiples of 8 in the starting chain. A 16-stitch chain gives a narrow 4 in (10 cm) scarf; a 32-stitch chain gives about 8 in (20 cm).
Is this pattern suitable for a first cable project?
It is a good first cable project because the cable is only two stitches and the crossed stitches are separated by plain double crochet. Practice the LC on the swatch before starting the scarf.
How much yarn does the scarf use?
The estimate is about 480 yd (440 m) for a 60 in (152 cm) scarf at the stated gauge. This is a calculation from stitch counts, not a measured amount, so buy an extra skein if you plan fringe or a longer scarf.
Next: Try a matching leafy medallion headband worked in the round to practice joining rows without a turning chain.