Nestora
Hibiscus Flower Crochet Pattern: Easy Free Beginner Design
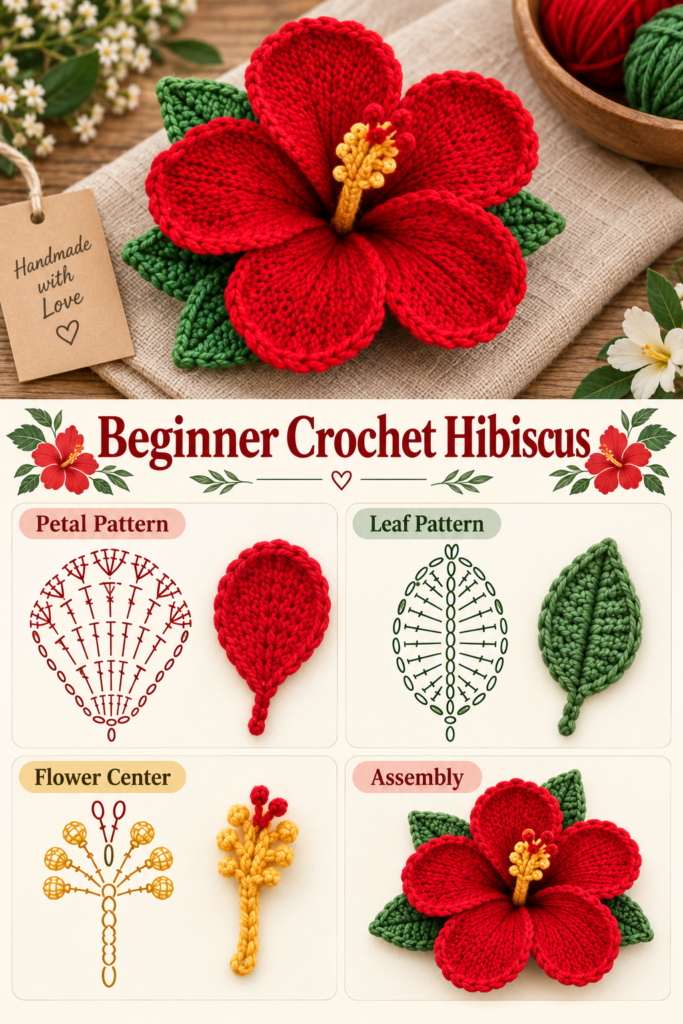
This pattern makes a five-petal crocheted hibiscus with a ruffled center and one leaf, worked in US terms with basic stitches only. It suits a confident beginner who can chain, single crochet, and double crochet. Plan about 4 hours for the full flower plus leaf, including the assembly.
Beginner Crochet Hibiscus Flower
Free crochet pattern · US terms
- Yarn
- 4 - Medium (worsted) — suggested
- Hook
- 4.0 mm (G-6) — verify with a swatch
- Gauge
- 16 sc x 18 rows = 4 in (10 cm) in single crochet, unblocked (calculated, not measured)
- Size
- approx. About 5 in (13 cm) across the flower and 3.5 in (9 cm) long for the leaf, based on the stated gauge
- Level
- Confident beginner
- Time
- about 4 h (estimate)
Written and count-checked on paper, not yet physically tested. Make the gauge swatch and the checkpoint below before you commit all your yarn.
The flower is built from three simple parts: five identical petals worked flat in rows, a small ruffled center worked in continuous rounds, and one shaped leaf worked flat. The petals are joined to the center with a small overlap so the bloom sits open rather than flat.
Each petal starts narrow at the base and widens into a rounded tip, which keeps the shaping easy while still reading as a hibiscus. The pattern suits anyone comfortable with basic stitches who wants a decoration, a bouquet stem, or a gift topper.
Before You Start
Materials
Suggested materials. Any yarn of the same weight works if you match the gauge.
1 skein medium weight cotton, flower color, about 50 g
Cotton holds a crisp petal shape and blocks well. Acrylic medium weight works as a substitute if you want a softer, slightly floppier flower.
1 skein medium weight cotton, leaf green, about 50 g
A single small skein covers several leaves. Leftover cotton in any green shade is fine.
4.0 mm (G-6) crochet hook
Matches the medium weight yarn for a firm fabric. Go up to 4.5 mm (7) if your stitches tend to be tight.
Tapestry needle
Needed for weaving in ends and stitching the petals to the center. A blunt tip slides through cotton without splitting it.
Stitch marker
Marks the first stitch of the continuous center rounds. A scrap of contrasting yarn works too.
Scissors
For trimming yarn tails close to the work.
Yarn needed (estimate): Estimated about 60 yd (55 m) flower color plus 15 yd (14 m) leaf color, roughly one 50 g skein of each
Gauge and Size
Gauge: 16 sc x 18 rows = 4 in (10 cm) in single crochet, unblocked. This gauge is calculated from the yarn and hook above, not measured on a finished sample. Make a 4 in (10 cm) swatch first; change the hook size, not your tension, until it matches.
Finished size (approximate): About 5 in (13 cm) across the flower and 3.5 in (9 cm) long for the leaf, based on the stated gauge. Your size depends on your gauge.
Abbreviations (US terms)
| Abbr. | Meaning |
|---|---|
| ch | chain |
| sl st | slip stitch |
| sc | single crochet |
| hdc | half double crochet |
| dc | double crochet |
| st | stitch |
| sts | stitches |
| sp | space |
| inc | increase: 2 sc in the same stitch |
| rep | repeat |
| MR | magic ring |
| FO | fasten off |
Special Stitches
Magic ring (MR)
Wrap the yarn twice around two fingers, pull the working yarn through the loop, and work your first stitches into the ring. Pull the short tail to close the hole after Round 1.
Single crochet increase (inc)
Work 2 sc into the same stitch. This adds one stitch to the round and is used to widen the center.
Petal tip cluster
In the same stitch, work 1 dc, 1 hdc, and 1 sc. This rounds the top of the petal without a sharp corner.
How This Pattern Is Written
- All instructions use US crochet terms. The turning chain at the start of a row (ch 1) does not count as a stitch unless stated.
- Petals are worked flat in rows, one at a time, and are joined to the center afterward. The center is worked in continuous rounds without joining, so use a stitch marker.
- The right side of the petal faces you on odd-numbered rows. Keep the same side facing out when you sew petals to the center.
- The leaf is worked flat in rows around a starting chain, with increases at both ends to shape the point. The 8 skipped stitches in Leaf Row 8 are intentional and form the opening that is filled by the ch-6 loop on Row 9.
- Gauge and finished size are calculated from the stated assumptions, not measured on a finished sample. Your size will vary with tension and yarn.
The Pattern
Petal (make 5)
Center
Leaf
Finishing and Assembly
Sizes and Variations
Smaller bloom
use a 3.5 mm (E-4) hook and fine weight yarn. Stitch counts stay the same, and the finished flower shrinks to about 3.5 in (9 cm).
Two-tone flower
work Rows 1-8 of each petal in a darker shade and Rows 9-16 in a lighter shade for a shaded petal effect. No stitch counts change.
Bouquet stem
before sewing the petals to the center, wrap a 12 in (30 cm) floral wire with green yarn and sew it to the back of the center so the flower can stand.
Larger leaf set
make two extra leaves and sew them at the back to form a small spray. Each extra leaf adds about 15 yd (14 m) of yarn.
Troubleshooting
| What you see | Likely cause | Fix |
|---|---|---|
| The center curls into a cup instead of lying flat | Too many increases in the early rounds, or stitches worked too tightly | Frog back to Round 3 and check that each round has exactly 12, 18, and 24 sts. Work the increases a little looser. |
| Petal edges look jagged or stepped | The turning chain is being counted as a stitch, or the first stitch is missed | Treat the ch 1 as a turning chain only and always work the first sc into the stitch directly below it. |
| Petals do not meet neatly at the center | Bases overlap too much or too little when sewn | Pin all five petals in place first so the bases just touch, then sew. Adjust before the thread is anchored. |
| Flower looks flat and lifeless | Petals were sewn flat against the center with no angle | Angle each petal slightly upward as you sew, catching only the outer edge of the center so the petal can lift. |
| Leaf points curl under | Tension tightened at the increase rows | Work the increase rows with a slightly looser hand, then block the leaf flat with pins before sewing. |
Care
Hand wash in cool water with a mild soap and squeeze gently, do not wring. Roll in a towel to remove water and dry flat, reshaping the petals while damp. Do not tumble dry or iron directly; a cool iron held above the surface is enough to smooth cotton.
Questions Makers Ask
How much yarn does one hibiscus flower use?
About 60 yd (55 m) of medium weight cotton for the flower and 15 yd (14 m) for the leaf, estimated. One 50 g skein of each color leaves enough for several flowers.
Can a total beginner crochet this flower?
Yes, if you already know chain, single crochet, and double crochet. The petals are simple flat rows, and the center uses only single crochet increases. Practice the magic ring first if it is new to you.
How do I attach the flower to a stem or a gift?
Sew a wrapped floral wire to the back of the center for a stem, or sew the flower directly onto a bag, hat, or wrapped gift. Use matching thread and catch the center only so the petals stay free.
Do I need to block the petals?
Blocking is optional but helps the petals hold an open shape. Mist lightly, pin face down, and let dry flat. Cotton responds well to this; acrylic may need steam instead.
Next: Try a crocheted rose or daisy next to build a small bouquet and practice layering petals around a center.