
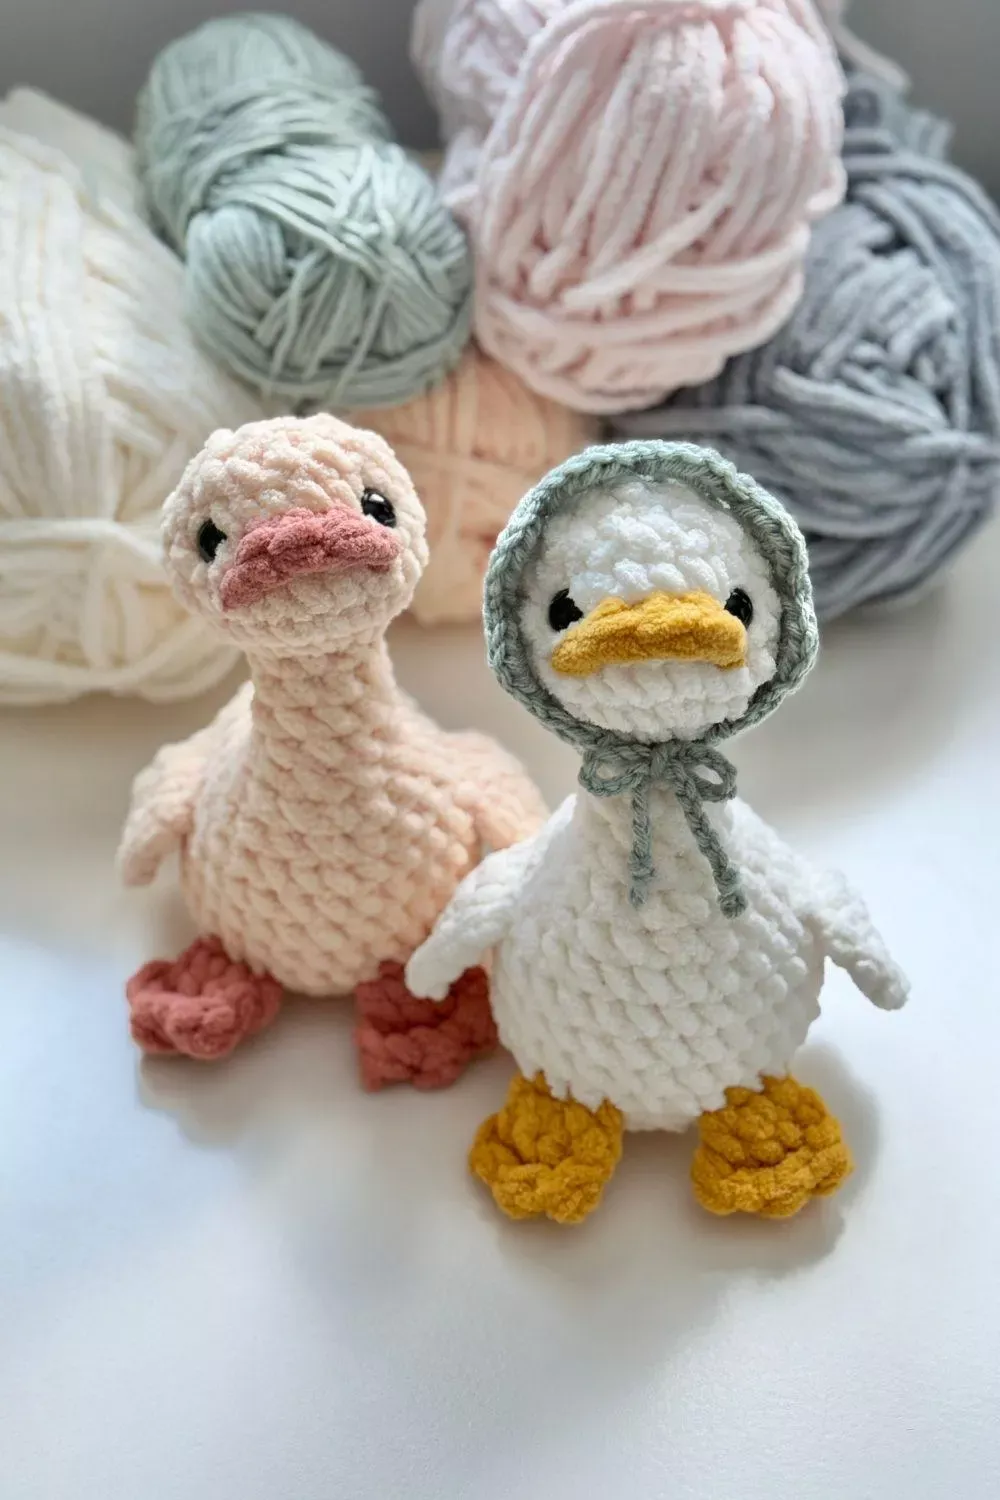
You will crochet a plump standing goose in single crochet, working the body and head as one continuous piece, then adding a beak, wings and feet. It uses beginner stitches plus simple increases and decreases. Most crocheters finish in about 4 hours.
Marjorie Goose Amigurumi
Free crochet pattern · US terms
- Yarn
- 4 – Medium (worsted) — suggested
- Hook
- 4.0 mm (G-6) — verify with a swatch
- Gauge
- 18 sc x 20 rounds = 4 in (10 cm) in single crochet worked in continuous rounds, unblocked. This gauge is calculated from the stated hook and yarn, not measured on a finished sample. (calculated, not measured)
- Size
- approx. About 7 in (18 cm) tall from feet to top of head and 6 in (15 cm) long from tail to chest, based on the stated gauge.
- Level
- Confident beginner
- Time
- about 4 h (estimate)
Written and count-checked on paper, not yet physically tested. Make the gauge swatch and the checkpoint below before you commit all your yarn.
The goose is a small stuffed figure with an oval body, a curved neck and a rounded head, all worked in one continuous spiral. The beak, two wings and two feet are made separately and sewn on, and the eyes are embroidered so there are no small hard parts.
It suits a confident beginner who can work single crochet in the round and has made at least one small amigurumi before. The shaping is gentle, the stitch counts stay small, and the whole goose uses less than one skein of worsted yarn.
Before You Start
Materials
Suggested materials. Any yarn of the same weight works if you match the gauge.
1 skein worsted weight acrylic or cotton-blend yarn in white, about 100 g
A smooth, tightly plied yarn hides stuffing and shows stitch definition. Cotton-blend dishcloth yarn is a good substitute and gives a firmer figure.
Small amount of worsted yarn in orange, about 10 g
Used for the beak and feet. Any medium weight orange scrap works; split it if you want a thinner beak.
4.0 mm (G-6) hook
Matched to worsted weight for a dense fabric. Go down to 3.5 mm (E-4) if your stitches feel loose.
Polyester fiberfill, a small handful
Light stuffing keeps the shape without stretching the stitches. Cotton or wool scraps can substitute but pack less evenly.
Black embroidery floss and a tapestry needle
Floss makes neat eyes with no plastic parts. Fine black yarn doubled also works.
Stitch marker
Marks the first stitch of each continuous round. A scrap of contrasting yarn works too.
Blunt tapestry needle
For sewing the pieces together and weaving in ends. Blunt tip slides between stitches without splitting them.
Yarn needed (estimate): Estimated about 130 yd (120 m) total: about 110 yd (100 m) in white and about 20 yd (18 m) in orange, from 100 g skeins
Gauge and Size
Gauge: 18 sc x 20 rounds = 4 in (10 cm) in single crochet worked in continuous rounds, unblocked. This gauge is calculated from the stated hook and yarn, not measured on a finished sample.. This gauge is calculated from the yarn and hook above, not measured on a finished sample. Make a 4 in (10 cm) swatch first; change the hook size, not your tension, until it matches.
Finished size (approximate): About 7 in (18 cm) tall from feet to top of head and 6 in (15 cm) long from tail to chest, based on the stated gauge.. Your size depends on your gauge.
Abbreviations (US terms)
| Abbr. | Meaning |
|---|---|
| ch | chain |
| sc | single crochet |
| sl st | slip stitch |
| inc | increase: work 2 sc in the same stitch |
| dec | decrease: single crochet 2 stitches together |
| st | stitch |
| sts | stitches |
| FO | fasten off |
| MR | magic ring |
| rep | repeat |
Special Stitches
Magic ring (MR)
Wrap the yarn twice around two fingers, insert the hook into the loop, pull up a loop, ch 1 to secure, then work the stated number of sc into the ring. Pull the tail to close the center hole.
Single crochet decrease (dec)
Insert the hook into the front loop of the next st, then into the front loop of the following st. Yarn over and pull through both loops, yarn over and pull through the last 2 loops. Two stitches become one.
How This Pattern Is Written
- All instructions use US crochet terms.
- The body, neck and head are one piece worked in continuous rounds. Do not join or turn unless a row says so. Move the stitch marker to the first stitch of each new round.
- The turning chain is not used in the body, neck, head, beak or feet, because those pieces are worked in the round. The wings are worked flat, and there a ch 1 at the start of each row is the turning chain; it does not count as a stitch.
- The right side of the work faces out. Keep the starting tail inside the piece.
- Every round's starting count equals the previous round's ending count. Numbers in parentheses are the stitches you should have when the round is done.
- Stuff the body firmly but not hard, in small pinches, before the opening gets too small.
- No gauge and no finished measurements are given; none are claimed as tested or measured.
The Pattern
Body, neck and head (one piece)
Beak
Wings (make 2)
Feet (make 2)
Finishing and Assembly
Sizes and Variations
Small gosling
use a 3.0 mm hook and fine yarn. Keep all counts the same; the finished goose is about 5 in (13 cm) tall.
Sitting goose
leave out the feet and sew a small oval of crochet fabric to the base so it sits flat.
Two-tone goose
change to a gray or beige yarn after Round 20 for a gray-headed look. Carry the old color inside the neck.
Troubleshooting
| What you see | Likely cause | Fix |
|---|---|---|
| Stuffing shows between stitches | Gauge is too loose or the hook is too large for the yarn | Frog back to the last round and rework with a 3.5 mm (E-4) hook, or add a second layer of stuffing wrapped in a scrap of fabric. |
| The neck leans or kinks | Too much stuffing in the neck, or an uneven join between body and head | Pull out some stuffing with the hook handle and roll the neck between your fingers to even it out. |
| The goose will not stand up | The feet are sewn too far apart or the base is understuffed | Add stuffing to the bottom of the body, then resew the feet closer together and flatter. |
| A round ends with too many or too few stitches | The stitch marker was moved by mistake, or a stitch was worked twice | Count the stitches in the round just finished. If the count is off by 1 or 2, work a dec or inc in the next round to correct it before continuing. |
| The beak looks twisted | It was sewn on with the starting tail pulling to one side | Remove the beak, turn it so the wider round faces down, and sew again with small even stitches. |
Care
Hand wash in cool water with a little mild soap, squeeze gently without wringing, and reshape while damp. Air dry away from direct heat. Do not tumble dry, because heat can melt acrylic fibers and clump the stuffing.
Questions Makers Ask
How much yarn does the goose use?
About 130 yd (120 m) total, with roughly 110 yd (100 m) in white and 20 yd (18 m) in orange. That is less than two 100 g skeins, so one skein of each color is plenty.
Can I use safety eyes instead of embroidery?
Yes, if the goose is for an adult or a child over 3. Use 6 mm eyes and insert them between Rounds 30 and 31 before you close the head. Embroidered eyes are safer around babies and pets.
Do I have to make the feet?
No. The goose sits without them; the feet only help it stand. Skip the feet section and sew a flat oval to the base if you want it to sit level.
Why is my goose smaller than 7 inches?
Gauge controls size. A tighter gauge makes a smaller, firmer goose. Check your gauge in the round first, and change hook size rather than stitch counts.
Next: Try a small amigurumi duckling with the same body shaping, or move on to a flat crochet project like a simple washcloth to practice even tension.