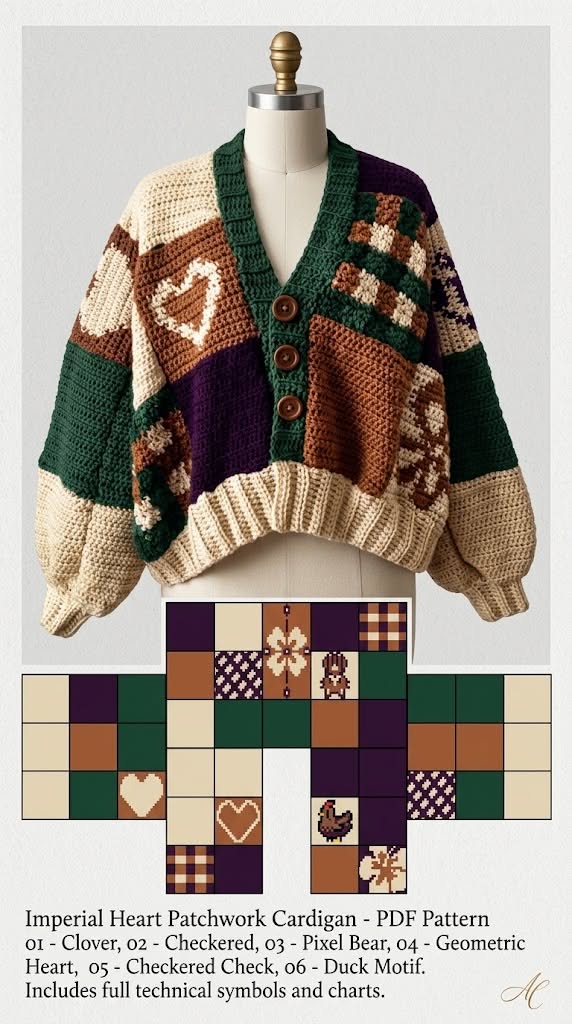
You will make an oversized, drop-shoulder patchwork cardigan from solid and motif squares, then join them into front, back, and sleeve panels. It needs confident-beginner skills: single crochet, color changes, and seaming. Estimated working time is about 20 to 26 hours, spread over several sittings.
Imperial Heart Patchwork Cardigan
Free crochet pattern · US terms
- Yarn
- 4 – Medium (worsted) — suggested
- Hook
- 5.0 mm (H-8) — verify with a swatch
- Gauge
- 14 sc x 16 rows = 4 in (10 cm) in single crochet, unblocked. One 6 in (15 cm) square = 21 sts x 24 rows. (calculated, not measured)
- Size
- approx. Approximate finished measurements, oversized fit: chest circumference 52 in (132 cm), body length 26 in (66 cm), sleeve length from shoulder 19 in (48 cm). Sizes shift by adding or removing squares.
- Level
- Confident beginner
- Time
- about 23 h (estimate)
Written and count-checked on paper, not yet physically tested. Make the gauge swatch and the checkpoint below before you commit all your yarn.
The cardigan is built from 6 in (15 cm) squares worked flat in single crochet. Plain squares and charted motif squares (a geometric heart, a checkerboard, and simple pixel shapes) are arranged on a layout grid, then joined with a flat slip-stitch seam into a boxy body and straight sleeves. Ribbing is added last along the front edges, neckline, and cuffs.
It suits crocheters who can keep an even single crochet tension and read a small color chart. The oversized fit is forgiving, and each square is a small, finishable unit, so the project travels well.
Before You Start
Materials
Suggested materials. Any yarn of the same weight works if you match the gauge.
Worsted weight acrylic or acrylic-wool blend, 4 colors: about 700 yd main (forest green), 300 yd plum, 300 yd rust, 300 yd cream
Acrylic blends hold square shape well and wash easily. A smooth wool-blend worsted is a warm substitute; avoid fuzzy yarns because they hide the pixel motifs.
5.0 mm (H-8) crochet hook
Matches worsted weight for a dense, stable square fabric. Swatch and move to 4.5 mm if your squares come out larger than 6 in.
Tapestry needle
Needed for joining squares and weaving in many color-change ends. A blunt-tip needle with a large eye works best.
Stitch markers
Useful for marking square corners, sleeve placement, and the front edge while joining. Paper clips work as a substitute.
Tape measure and scissors
For the early square checkpoint and final measurements.
Yarn needed (estimate): Estimated about 1,600 yd (1,460 m) total; roughly 5 skeins of 200 g in the main color plus 1 to 2 skeins each of three contrast colors
Gauge and Size
Gauge: 14 sc x 16 rows = 4 in (10 cm) in single crochet, unblocked. One 6 in (15 cm) square = 21 sts x 24 rows.. This gauge is calculated from the yarn and hook above, not measured on a finished sample. Make a 4 in (10 cm) swatch first; change the hook size, not your tension, until it matches.
Finished size (approximate): Approximate finished measurements, oversized fit: chest circumference 52 in (132 cm), body length 26 in (66 cm), sleeve length from shoulder 19 in (48 cm). Sizes shift by adding or removing squares.. Your size depends on your gauge.
Abbreviations (US terms)
| Abbr. | Meaning |
|---|---|
| ch | chain |
| sl st | slip stitch |
| sc | single crochet |
| st | stitch |
| sts | stitches |
| rep | repeat |
| FO | fasten off |
| RS | right side |
| WS | wrong side |
Special Stitches
Single crochet color change (sc color change)
Work the sc until two loops remain on the hook. Drop the old color, yarn over with the new color, and pull through both loops to finish the stitch. Carry the unused color loosely along the top of the previous row or cut and rejoin for isolated pixels.
Flat slip-stitch seam (sl st seam)
Hold two squares with RS together. Insert the hook through both edge stitches at once, yarn over, and pull through both loops and the loop on the hook. Work one sl st per stitch pair along the edge, keeping tension loose so the seam lies flat.
How This Pattern Is Written
- All instructions use US crochet terms.
- Squares are worked flat in rows, turning at the end of each row. The turning ch 1 does not count as a stitch and is never worked into; work the first sc of each row into the first st.
- Right side of each square faces you on odd-numbered rows. Motif charts are read from the bottom up, and colors are changed on the last loop of the stitch before the new color block.
- Each square is 21 sts wide and 24 rows tall. The border is worked in the round without turning: 21 sc along each row edge, 1 sc in each row end along the side edges, 21 sc along the starting chain. Squares are joined with RS together using a flat sl st seam, then the piece is turned RS out.
- The cardigan is oversized and boxy: front and back panels are 4 squares wide by 4 squares tall, and each sleeve is 2 squares wide by 3 squares tall.
- Yardage and finished size are estimates calculated from the stated gauge; your own square measurement controls the final fit.
The Pattern
Square A: Plain Square (make 10)
Square B: Geometric Heart Square (make 6)
Square C: Checkerboard Square (make 8)
Square D: Pixel Duck Square (make 4)
Finishing and Assembly
Sizes and Variations
Cropped Fit
Use 3 squares tall on back and fronts instead of 4; total square count drops by about 16 squares and yardage drops roughly 25 percent.
Longer Sleeves
Make each sleeve 2 squares wide by 4 tall and adjust the armhole opening to 9 in (23 cm).
Solid Colorway
Work all squares in one color and let texture carry the design; motif squares use the same stitch counts, so the layout grid is unchanged.
Patch Pocket
Add one extra motif square to each front as a sewn-on pocket after assembly.
Troubleshooting
| What you see | Likely cause | Fix |
|---|---|---|
| Squares come out different sizes | Tension changed between sittings or color changes pulled tight | Measure every square at Row 12 and compare; rework any square more than 0.25 in (6 mm) off, and keep carried yarn loose. |
| Motif looks slanted or pixel edges are jagged | Color changed mid-stitch instead of on the last loop, or the chart was read top to bottom | Always finish the stitch with the new color on the final yarn over, and read charts from the bottom row up. |
| Seams pucker and the cardigan hangs unevenly | Sl st seam worked too tightly or stitch pairs mismatched | Use a larger hook for seaming and count one sl st per stitch pair; unpick and reseam any section that pulls. |
| Front edges wave instead of lying flat | Too many stitches picked up along the front edge | Pick up about 3 sc for every 4 row ends, then check the band lies flat before working the remaining ribbing rows. |
| Armholes too tight to wear comfortably | Side seam closed too high | Unpick the top few seam stitches to open the armhole to 7 in (18 cm) and reseam the sleeve to fit. |
Care
Machine wash cold on a gentle cycle and lay flat to dry; do not tumble dry. Block lightly with a mist of water and pins, and store folded rather than hung to keep the boxy shape.
Questions Makers Ask
How many squares do I need for this cardigan?
About 28 squares: 16 for the back, 8 for each front, and 6 per sleeve, plus a few spares. The layout grid in the pattern shows exactly which motif goes where, and the count changes if you choose the cropped variation.
Can I make this cardigan with one color of yarn?
Yes. Work every square in a single color using the same stitch counts, and the panel sizes stay identical. The motifs will read as texture rather than color blocks.
Do I need to block the squares before joining?
Blocking is strongly recommended because it evens out square sizes so seams lie flat. Lightly mist and pin each square to 6 in (15 cm), then let it dry fully before seaming.
Is this pattern suitable for a first garment?
It is a good first garment if you are comfortable with single crochet and simple color changes. The squares are small and the oversized fit is forgiving, though the seaming takes patience.
Next: Try a patchwork granny-square vest next to practice shaping armholes and necklines with the same joining skills.